If you want to get more leads and grow your business, LinkedIn Sales Navigator is one of the best tools you can use. It’s built to help you find the right people, connect with them, and turn those connections into real opportunities.
In this guide, I’ll show you step by step how to use LinkedIn Sales Navigator to find and organise potential leads, making the most of its powerful features.
Contents
- LinkedIn Sales Navigator | What It Is and Why You Need It
- How to Define Your ICP for LinkedIn Sales Navigator Success
- Use Account Search to Build a Targeted List
- Use Lead Search to Find People in Those Accounts
- Engaging with Leads on LinkedIn Sales Navigator
- Pro Tips for Making the Most of LinkedIn Sales Navigator
- Summary
LinkedIn Sales Navigator | What It Is and Why You Need It
LinkedIn Sales Navigator is a premium feature on LinkedIn designed to help you find the right people to connect with. It allows you to refine searches with advanced filters, organise your prospects efficiently, and even suggests leads you might want to reach out to.
It’s perfect for salespeople, marketers, and business owners who want to connect with the right decision-makers without wasting time. If you’re new to it, don’t worry—this guide will walk you through everything you need to know to get started.
You can sign up to Sales Navigator here. At £69.99 per month, it’s an investment worth making if you use it effectively. Most users can also access a 1-month free trial, so you can test it out and see how it fits into your strategy.
Why do I advocate for Sales Navigator first over other lead generation methods like cold emails, paid ads, or affiliate marketing? It’s simple: with Sales Navigator, you’re not just generating leads—you’re building connections. When you connect with a prospect as part of your outreach process, they become part of your LinkedIn network.
Even if they don’t respond to your offer now or aren’t interested at the moment, that connection is there forever. You can circle back to them later, or they might see your posts and updates over time, keeping you top of mind. When the need for your product or service arises, they’ll think of you. This is why it’s important to post consistently and build a strong LinkedIn presence. Support with social media management can help you stay visible and top of mind without needing to do everything yourself.
No other lead generation technique provides this kind of long-term visibility and relationship-building, which is what makes LinkedIn Sales Navigator so powerful for B2B marketing.
How to Define Your ICP for LinkedIn Sales Navigator Success
Before you dive into LinkedIn Sales Navigator, it’s essential to know exactly who you’re looking for. This starts with defining your Ideal Customer Profile (ICP) and Buyer Persona (BP).
Your ICP describes the type of company that’s most likely to benefit from your product or service.
Your BP, on the other hand, focuses on the people within those companies who are the best fit for outreach. These could be decision-makers or individuals influencing decisions.
For instance, in larger companies, you might skip reaching out to the CEO or founder and instead connect with specific roles, such as the Head of Digital or Head of HR. You can also identify multiple buyer personas for a more comprehensive approach to targeting a business.
Here’s a brief example of how you can define both:
For Your ICP (Company-Level Details):
- Location: Where are these companies based?
- Company Size: Are they small businesses, mid-sized companies, or large corporations?
- Industry: What sectors do they operate in?
- Revenue: What’s their annual turnover?
- Company Type: Are they private, public, or non-profit?
For Your BP (Individual-Level Details):
- Job Title: What roles are they in? (e.g., Marketing Manager, HR Director)
- Seniority Level: Are they managers, directors, or executives?
- Location: Where are they based?
- Years in Company: Are they established in their role or new hires?
Why This Matters
Defining your ICP and BP isn’t just a planning exercise—it’s how you set the filters in LinkedIn Sales Navigator to find the right companies and the right people. Without this clarity, your searches can become too broad, wasting time and effort.
If you’re unsure where to start, don’t worry—I have a template designed specifically for LinkedIn Sales Navigator that can guide you through the process.
Feel free to reach out, and I’ll be happy to share it!
Use Account Search to Build a Targeted List
The first tool you’ll use in Sales Navigator is Account Search. This helps you find companies that match your ICP.
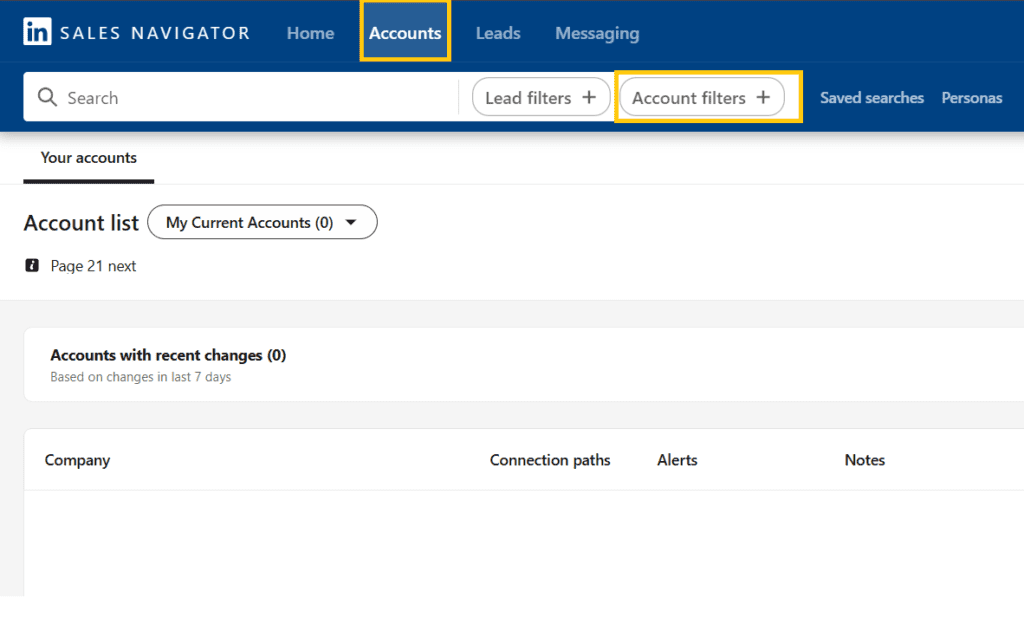
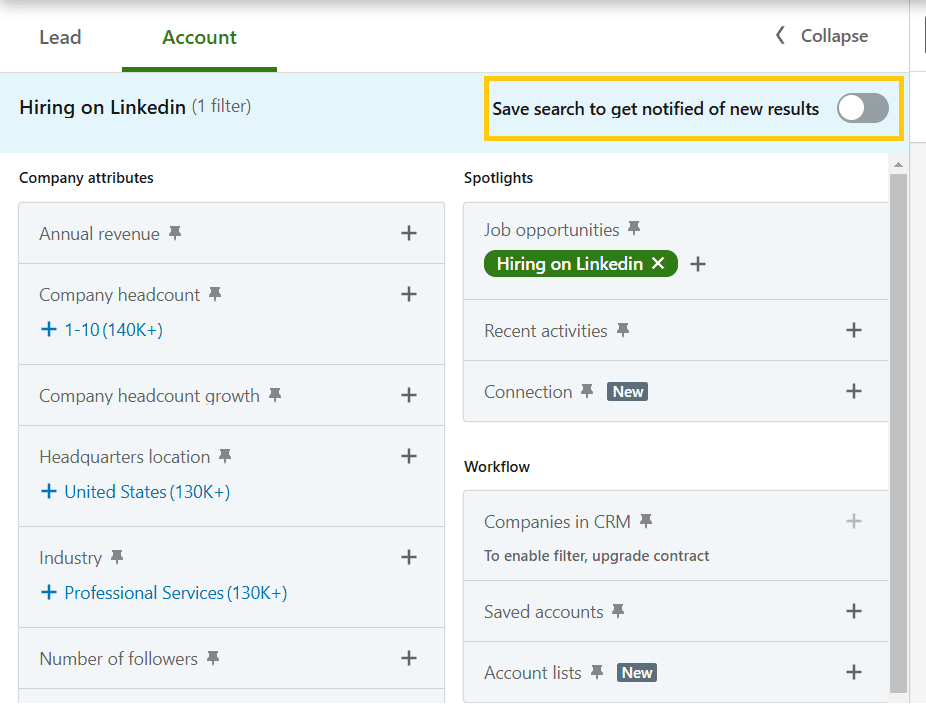
Apply filters that align with your ICP, such as industry, location, or company size. Once you’ve set your filters, you can save the search for future use.
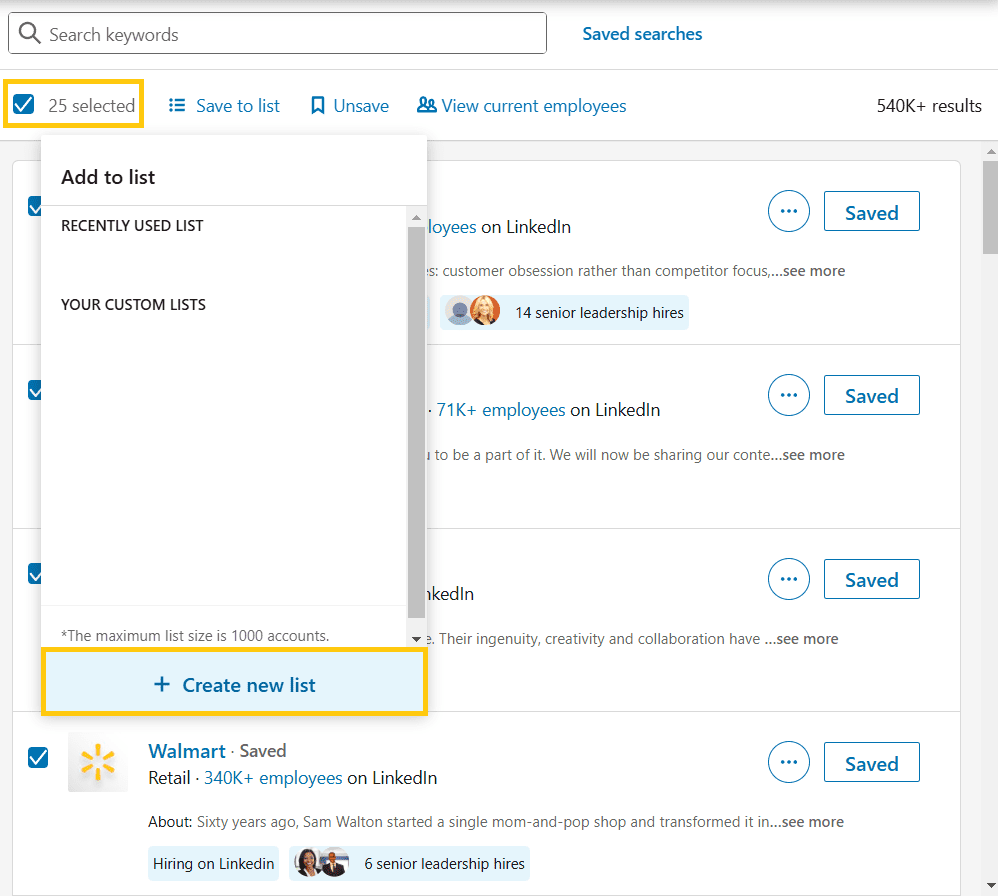
After applying your filters, you can start saving accounts to a new account list. Each list can hold up to 1,000 accounts. However, since you can only select 25 accounts at a time, you’ll need to repeat this process for each page of accounts.
Once you’ve built an account list of companies that match your ICP, you can move to the next step.
Use Lead Search to Find People in Those Accounts
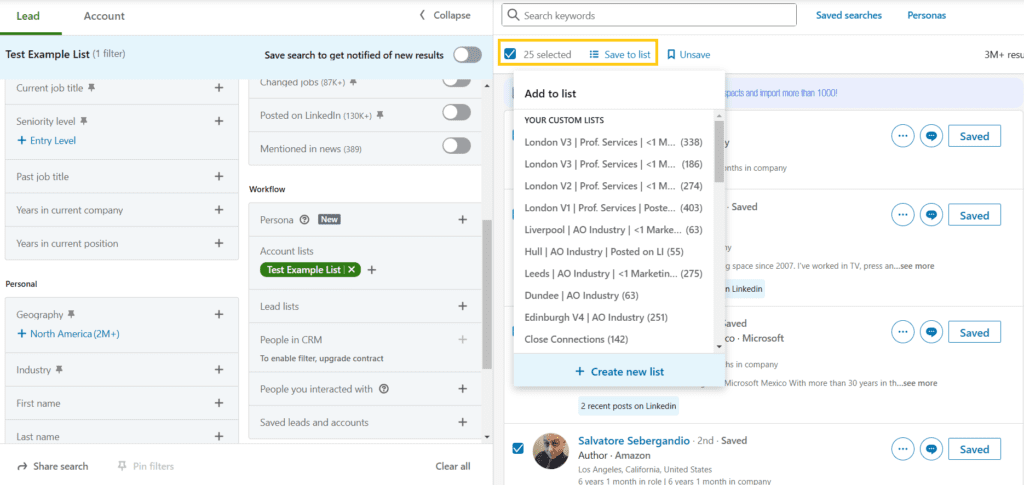
Now that you have a list of companies, it’s time to narrow your focus and identify the specific people you need to reach out to. This is where the Lead Search feature comes in.
Navigate to the Lead Filters tab.

Input your account list into the Account lists parameter to ensure you’re only searching for people within the companies you’ve already identified.
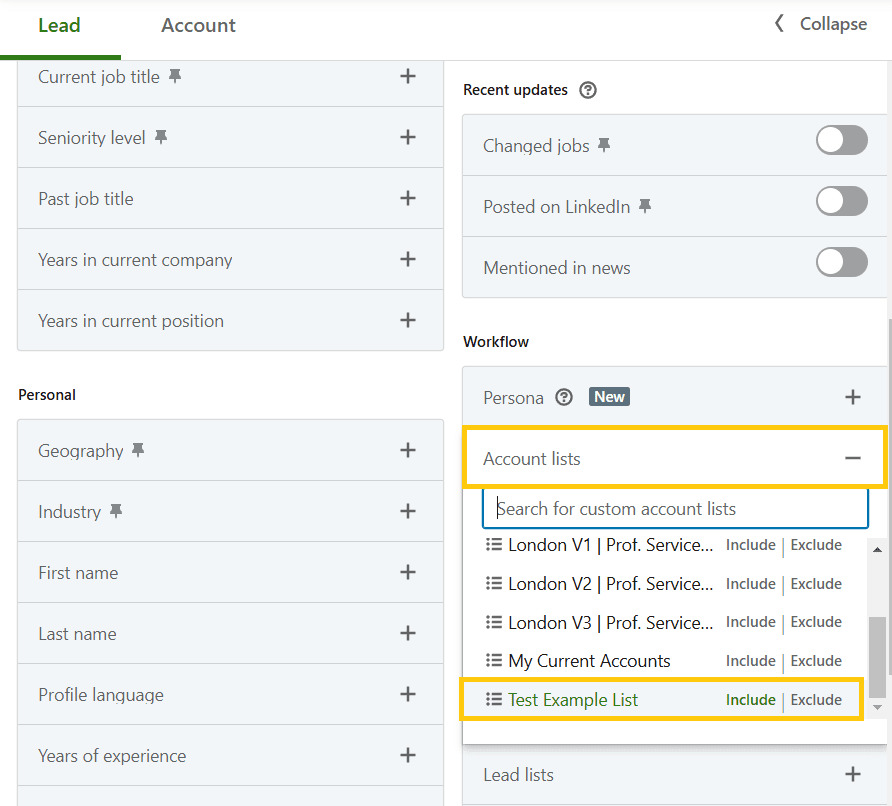
Apply filters such as job title, seniority level, and location, ensuring you focus on individuals most likely to influence purchasing decisions for your product or service. Once you’ve refined your search, save the leads to a new list.
Engaging with Leads on LinkedIn Sales Navigator
You can access your new leads list by navigating to the Lead tab and selecting your saved list.

This is now your final lead list. You can choose to manually review and connect with these leads individually or use third-party tools and software to automate your outreach for greater efficiency. Additionally, you can extract information such as phone numbers and email addresses to create a comprehensive multi-touch outreach campaign.
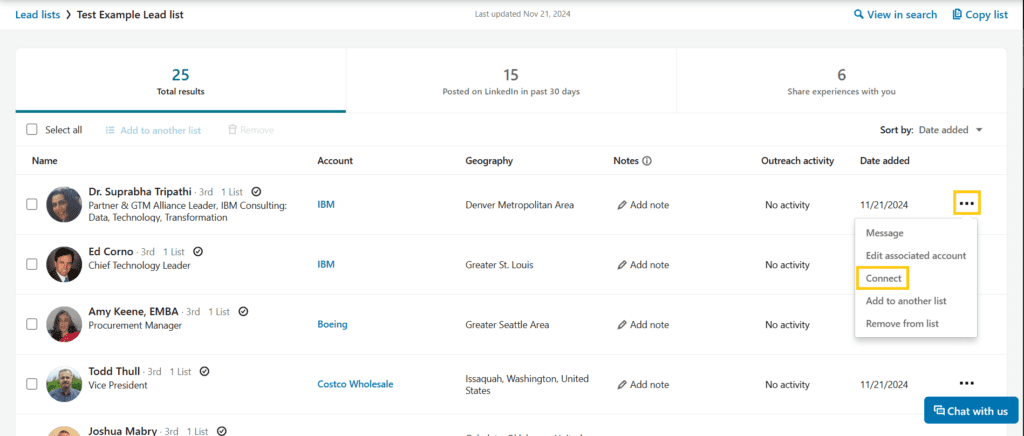
Both approaches—manual outreach and automation—have their pros and cons. Reaching out manually with personalised messages often delivers the best results because it feels more genuine and tailored to the recipient. However, it’s time-consuming and requires significant effort.
On the other hand, automating your outreach can help you scale your efforts and reach more people quickly, but it comes at the cost of personalisation, which may reduce engagement.
There’s still a strong case for manual outreach, especially if you craft your messaging carefully. In fact, I grew my business from 0 to 6 figures using this exact method, without relying on any other form of advertising. That said, I’d only recommend this approach if you have a high Customer Lifetime Value (CLV). For example, if each customer represents a significant revenue opportunity, the time investment can be well worth it. It’s less practical if you’re selling low-cost products or services.
If you’d like support building or running an outreach system that actually converts, my lead generation service combines proven messaging with data-driven targeting to help you generate quality leads without the stress of doing it all yourself.”
Pro Tips for Making the Most of LinkedIn Sales Navigator
Here are some extra tips to help you get the best results:
- Save Searches: Save your account and lead searches to avoid starting from scratch every time. This ensures consistency and saves time when revisiting your strategy.
- Set Alerts: Stay updated when your saved leads or accounts have activity, such as job changes, company news, or funding announcements. These updates can provide perfect triggers for outreach.
- Be Personal: When reaching out, include something specific about the person or their company to make your message stand out and feel genuine.
- Be Creative with Targeting: Use the filters creatively to uncover unique prospects. For example, if you’re an HR consultancy offering redundancy management services, you can filter for companies with negative growth over the past year.
- Use “In Common” Insights: Leverage LinkedIn’s “In Common” section when viewing profiles. Mentioning shared connections, schools, or industries can create an immediate bond and make your message more relatable.
- Utilise Tags and Notes: Organise your leads by tagging them and adding notes within Sales Navigator. This helps you track where you are in your outreach process and remember key details about each lead.
- Focus on Warm Introductions: Use your existing network to get introduced to mutual connections within your target accounts. A warm intro is often far more effective than a cold message.
- Optimise Your Profile: Remember, your prospects are likely to check out your LinkedIn profile. Make sure it clearly communicates who you are, what you offer, and includes a professional yet approachable profile photo.
- Measure Your Performance: Keep track of your outreach efforts and refine your filters and messaging based on what’s working. LinkedIn’s analytics and insights can help you identify trends and areas for improvement.
- Follow Up Strategically: Many prospects don’t respond to the first message. Set a follow-up schedule that’s persistent but respectful, offering additional value with each interaction.
Summary
LinkedIn Sales Navigator is a powerful tool, but success lies in using it strategically. Begin by defining your Ideal Customer Profile (ICP), use Account Search to identify the right companies, and then leverage Lead Search to connect with key decision-makers.
By following these steps, you’ll not only generate more leads but also develop stronger relationships with the right people, setting the stage for long-term success.
Give these tips a try, and if you need help or training to develop a more comprehensive outreach funnel, feel free to reach out—I’d be happy to assist!

